Feeds:
Posts
Comments

Posts Tagged ‘quick meal’

Teriyaki Tilapia Recipe - bonjourHan

Today, because it’s the Christmas season, and because festive holiday food is showing up everywhere, and because I’ve been cooking an embarrassing amount of peppermint/gingerbread/pumpkin-themed desserts……

I’m going to give you a recipe for Asian fish.

Not everything in this life has to make sense. You didn’t think you were going to learn major life lessons on my blog today. You’re welcome.

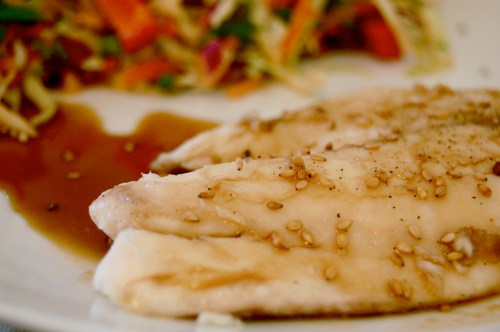
This teriyaki tilapia fish had a very mild flavor, which went splendidly with the flavorful Asian slaw. The recipe is adapted from Better Homes and Gardens.

Ingredients

The toasted sesame seeds were a big part of the flavor. You can buy a huge bag of toasted sesame seeds for cheap at an Asian market and just keep it in your freezer, but I think they sell smaller containers at your average grocery store for a much higher price per ounce.

  • 4 mild fish fillets
  • 1/4 tsp black pepper
  • 3 Tbs low-sodium soy sauce
  • 1/4 cup rice vinegar
  • 2 tsp honey (I used my favorite local honey from Desert Creek Honey)
  • 2 tsp sesame oil (or any other cooking oil)
  • 2 tsp toasted sesame seeds

I used frozen tilapia fillets from Walmart and thawed them before cooking. I’m sure it tastes even better with nicer fish, but it still tasted good for us cheapos, too.

Directions

It’s really quick to throw together.

  1. Rinse fish and pat dry with paper towels. Sprinkle the fish with pepper and set aside.
  2. Combine the soy sauce, rice vinegar and honey in a small saucepan for the glaze. Bring to a boil, then reduce the heat and simmer uncovered for about 10 minutes or until slightly thickened. Set aside.
  3. Heat the oil over medium heat in a skillet and cook the fish while the glaze is simmering. It should take just a few minutes on each side until golden. It will flake apart with a fork when it’s done.
  4. Transfer fish to a plate or serving platter, drizzle with the glaze and sprinkle with the toasted sesame seeds.

Tilapia Fish Teriyaki - bonjourHan.com

Advertisement

Read Full Post »

Bowl of avocados and quinoa

I love light, filling, refreshing meals in summertime. This dish was exactly that. Stephen thought it was good, but he would’ve preferred something a little meatier. I, however, couldn’t get enough of it! When you’re making it, it looks like it might not taste very good, but that first bite transforms it into a thing of beauty. It’s really quick and easy, and it’s really cheap as well.

Ingredients

I got the recipe from the Better Homes and Gardens cookbook. I had been wanting to make it for a long time, and I finally got around to it. It’s definitely a keeper!

  • 1/2 cup uncooked quinoa (I got mine from the bulk section in Sprouts.)
  • 1 cup water (I got this from… the faucet. Way less exciting.)
  • 2 roma tomatoes, seeds removed and finely chopped
  • 1/2 cup shredded fresh spinach
  • 1/3 cup finely chopped red onion (I probably used closer to 1/2 cup)
  • 2 Tbs lemon juice
  • 2 Tbs olive oil
  • 1/2 tsp salt
  • 2 avocados, sliced (and seeded and peeled…). I actually cut mine into bite-size pieces.
  • 1/3 cup crumbled feta cheese (ok, by now you should know that I rarely measure cheese. You can wing it on this one.)

The recipe called for 2 avocados, but I would actually go for 3 next time. I love avocados, so I wanted them to have a bigger role in the meal. It’s technically supposed to make 4 servings, but I split the quinoa into 3 servings and used the avocados on only 2 of them; that’s why the photo at the top has so much avocado!

Directions

Quick and easy!

  1. Bring quinoa and water to a boil in a saucepan, then reduce heat. Simmer, covered, for about 15 minutes (liquid should be absorbed).
  2. Place cooked quinoa in a bowl and mix in tomato, spinach, and onion.
  3. Whisk lemon juice, olive oil and salt in a separate small bowl. Pour over quinoa mixture and mix.
  4. Add avocado and feta cheese.
  5. Try not to eat the entire bowl in one sitting.

If you’re making this ahead of time, brush the avocado slices with lemon juice to keep them from getting brown.

The remaining serving with no avocados:

Bowl of Greek quinoa mixture

Read Full Post »

wilted spinach, white beans and tomatoes

This side dish is delicious. Stephen thought it was ok, but I am a sucker for balsamic vinegar, so I loved it! It has a unique taste, so if you’re just beginning to build a relationship with plain vegetable dishes, you might want to wait a while before trying this.

Ingredients

This recipe makes 4 servings. The original recipe came from the Better Homes and Gardens cookbook, where it’s called “White beans & wilted spinach salad.” This dish is served warm, however, in which case I simply cannot file it into the “salad” category of my brain. Hence, the name change.

  • 1 medium onion, cut in half and thinly sliced
  • 6 cloves garlic, minced (use one of my favorite kitchen tools ever – it will change your life)
  • 1 Tbs olive oil (or thereabouts… of course I didn’t measure)
  • 1 can navy beans or cannellini beans, drained and rinsed (I used cannellini)
  • 1 14 1/2-oz can diced tomatoes
  • 1 tsp dried thyme (I used about 1/2 tsp because I’m not a fan of thyme if it’s too strong)
  • 4 cups fresh spinach, torn (I was lazy and didn’t tear mine)
  • 2 slices turkey bacon, cooked and crumbled (this didn’t make a huge difference in the flavor… if you have some on hand, use it, but if not, don’t worry about it)
  • 4 tsp balsamic vinaigrette (you can also use red wine vinaigrette)

Directions

This seriously just takes a few minutes to put together.

  1. Sauté the onion and garlic with the olive oil in a large skillet over medium heat until tender (about 3 minutes).
  2. Stir in the beans.
  3. Drain the tomatoes, reserving 1/3 cup liquid. Stir in the tomatoes, reserved liquid and thyme. Cook and stir until heated through, about 2 minutes.
  4. Add the spinach and bacon, stirring about 30 seconds to wilt the spinach.
  5. Divide into bowls and drizzle each bowl with 1 tsp vinaigrette (but seriously… who’s going to measure that?). Season with salt and pepper, and serve warm.

Read Full Post »

%d bloggers like this: