Feeds:
Posts
Comments

Posts Tagged ‘recipe’

Blueberry Banana Pancakes ~ bonjourHan.com

These pancakes look and smell amazing. I’m sure they would taste amazing too, but unfortunately I don’t like bananas. “Don’t add bananas,” you might say. But these faces love bananas.

This is why I make banana pancakes even though I can't stand bananas.

So the bananas stay.

Ingredients

  • 3/4 cup unbleached all-purpose flour
  • 1/4 cup buckwheat flour
  • 1/4 cup white whole wheat flour
  • 2 Tbs cornmeal
  • 1 Tbs sugar
  • 1 1/2 tsp baking powder
  • 1/2 tsp baking soda
  • 1/2 tsp salt
  • 1 1/2 tsp cinnamon
  • 2 eggs
  • 2 Tbs coconut oil
  • 1 – 1 1/4 cup unsweetened almond milk (My 3-year-old is lactose intolerant)
  • Butter for greasing the pan (Not THAT lactose intolerant)
  • 1 cup fresh blueberries
  • 1 banana, thinly sliced

I doubled the recipe and froze most of the pancakes. On busy mornings (or regular morning, let’s be honest) I can just pull a few out of the freezer and pop them in the microwave. My kids eat them unadorned with their hands, and aside from random smears of blueberry juice, cleanup is minimal. Unless the 3-year-old wants to see what happens when he crumbles the rest of his pancake into his cup.

Directions

  1. Whisk the dry ingredients together in a bowl.
  2. In a separate bowl beat the eggs.
  3. In a third bowl or microwavable measuring cup, heat the almond milk and coconut oil in the microwave until slightly warm (try 30 seconds). The coconut oil should be melted, but you should be able to stick the tip of your finger in it without feeling pain. That is my highly technical method for calculating the temperature of my baking liquids. If it is too warm, let it sit for a few minutes.
  4. Slowly pour the milk/coconut oil mixture into the egg bowl while whisking.
  5. Add the dry ingredients to the bowl of wet ingredients and whisk gently until mostly smooth (some lumps are ok). It should be somewhat thin, like cake batter.
  6. Gently fold in the blueberries.
  7. Heat a skillet or griddle over medium heat and when hot, “draw” all over the griddle with the unwrapped end of the stick of butter (or do something more civilized, whatever).
  8. Ladle about a 5″ circle of batter onto the griddle and drop a few banana slices on top. Repeat until you run out of space. Once the tops have lots of tiny bubbles and the pancakes appear to be more solid, flip them over to finish cooking.

I then cool them on a cooling rack and pop the whole thing in the freezer to flash freeze before removing them to a gallon-size plastic bag. Because I’m not the awesome mom who cooks breakfast in the actual morning (ain’t nobody got time for that).

Blueberry Banana Pancakes from bonjourHan Blog


This recipe is adapted from a book called “Cast Iron Cooking” by Dwayne Ridgaway.

Read Full Post »

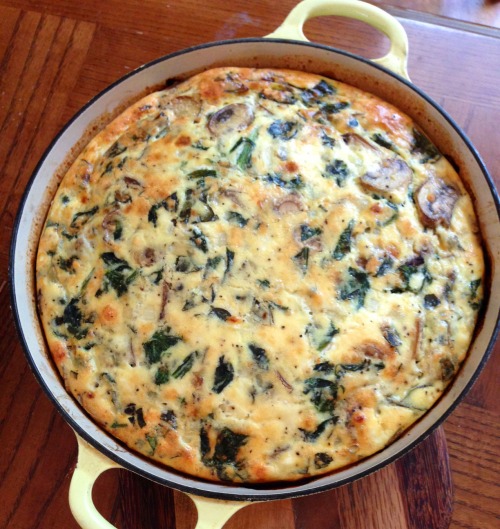
Breakfast Frittata - bonjourHan.com


We try to limit the amount of carbs we eat, and this frittata gives us a healthy option to grab in the mornings. I usually make it at night and then slice it into eight pieces and stick it in the fridge. For the next few days we grab a piece and microwave it for about 45 seconds for breakfast. It’s good for you, and it’s full of flavor. It’s also very flexible with what you have in your fridge.

Ingredients

It changes every time I make it, but this is what I used most recently.

  • 1 Tbs butter
  • 1 Tbs extra-virgin olive oil
  • 1/4 to 1/2 of a large onion, chopped
  • 1 clove garlic, minced
  • 1 package sliced mushrooms (This ingredient can be substituted for any number of other vegetables. Roasted red pepper is delicious too!) (Also, I can’t remember off the top of my head how many ounces are in a package of mushrooms. Is it 8 oz.? Basically, you’re going for one of those regular containers or mushrooms with the plastic wrap over the top. Or another kind. it doesn’t really matter.)
  • 2-3 cups chopped fresh spinach (or kale, or swiss chard, or any other leafy green besides lettuce)
  • 1/2 cup chopped fresh basil (or 1 teaspoon dried basil)
  • 8 eggs
  • 1/2 cup plain Greek yogurt (you could also use sour cream or heavy cream or even milk, though if you use milk, I would reduce the amount to about 1/3 cup)
  • 1/4 cup grated parmesan cheese
  • 1/2 to 1 cup of another cheese, grated or crumbled (Our favorite in this is feta, though it’s also delicious with cheddar, monterey jack, etc. We even used goat cheese once, and it was amazing.)
  • 1/2 tsp salt
  • 1/2 tsp black pepper

Directions

It takes a little time, but most of it is hands-off. I use my cast-iron skillet, so I don’t have to change pans to put it in the oven. If you don’t have a cast-iron skillet, you can sauté everything in one pan and transfer it to a pie pan for baking.

  1. Preheat oven to 375° F. Heat the butter and oil in a pan over medium heat.
  2. Add the onions and garlic and sauté until the onions are tender.
  3. Add the mushrooms and sauté a few minutes more, until they begin to soften.
  4. Add the spinach and stir until it begins to wilt. Remove from heat and stir in the basil. If not using a cast iron skillet, dump the contents into a pie pan.
  5. Whisk together the eggs, Greek yogurt, both cheeses, salt and pepper in a separate bowl.
  6. Pour the egg mixture into the skillet or pie pan and gently stir to distribute everything evenly.
  7. Place in the middle rack of the oven and bake for 30-40 minutes (you may need to watch it off and on for the last 10 minutes to keep it from getting too brown on top).

You can also mix everything up at night and store the sautéed vegetables separately from the bowl of whisked eggs. In the morning, just combine and pop into the oven.

Having a frittata ready to go in the fridge helps me actually eat breakfast, since I’m usually busy with these two cuties:

Brotherly love - bonjourHan.com


He squints one eye when he smiles, just like his daddy.


Smiling baby - bonjourHan.com

Mommy and big brother - bonjourHan.com


What would you put in your frittata?


Read Full Post »

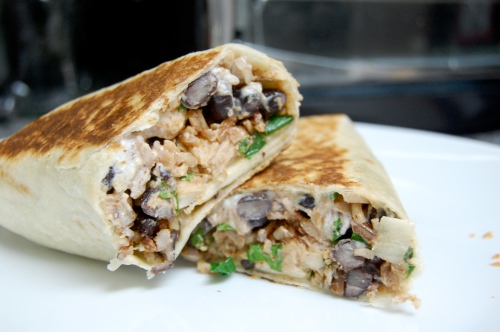
southwest chicken wrap

I made these wraps sometime last winter and just never got around to writing the blog post until I stumbled across the pictures again today.

I think there’s probably an easy-but-still-yummy way and a complicated-but-extra-special-touch way. Of course I made things more complicated by doing extra things to the chicken and letting the bowl of wrap filling sit on the counter for an hour to let the flavors mingle. (The flavors mingling thing was entirely on accident, since I forgot cheese and had to run to the store, then had to defrost the chicken in the microwave before cooking it.)

The recipe is from Mel’s Kitchen Cafe, but I’ll include my slightly tweaked version of the recipe here.

Ingredients

This is a really flexible recipe, but here’s what I used.

  • 1 cup cooked rice
  • 1 cup shredded cooked chicken (I sautéed chicken breast using the Cholula chili-lime seasoning and then shredded it.)
  • 1 can of black beans, rinsed and drained
  • 2 green onions, sliced
  • 1/4 cup cilantro, chopped (Fresh cilantro makes my heart sing.)
  • lime juice (1 lime’s worth, or a few squirts from a bottle of lime juice since I never have limes)
  • 1/2 Tbs chili powder
  • 1 tsp cumin
  • 1/4 tsp garlic powder
  • 1/4 tsp salt
  • 2 cups shredded cheddar (or less if you’re trying to be healthy… I wasn’t.)
  • 6 large flour tortillas (burrito size)
  • sour cream (optional)
  • salsa (optional)
  • homemade guacamole (optional)

You will also need a small amount of butter (or cooking spray, but butter tastes better) for lightly smearing on the seam of the burrito roll before cooking.

Directions

It’s especially quick and easy if you have the rice and chicken cooked ahead of time, but I didn’t. It’s even quicker if you don’t have to run to the store in the middle of assembling it to pick up the cheese you forgot…

  1. Mix the chili powder, cumin, garlic and salt into the rice.
  2. Add the chicken, beans, green onions, cilantro and lime juice and stir it all together.
  3. Sprinkle the cheese onto the tortillas and smear a little sour cream over the cheese, if desired.
  4. Spoon the rice mixture into a line down the center of each tortilla.
  5. Roll up the tortillas, leaving the edges open, and smoosh each wrap just a tiny bit with your hand to create flatter sides for cooking. Smear just a little butter (or cooking spray) on each of the two flat sides (one of the flat sides should include the “seam”).
  6. Heat a large skillet over medium heat. Cook the wraps 2-3 minutes on each side, starting with the seam side down first. Serve with salsa and guacamole.

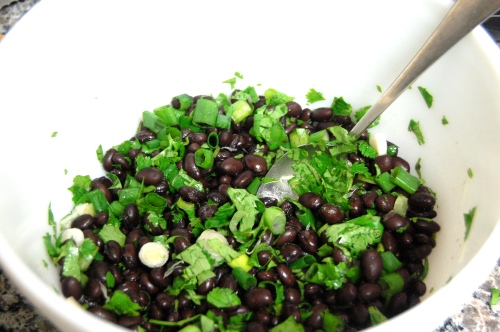
beans cilantro onions

chicken wrap filling

crispy chicken wrap

Read Full Post »

Nun’s puffs

Nun's Puffs dessert

I really have no idea why they’re called “nun’s puffs,” but if anyone knows where this deceptively stoic name came from, I’d love to hear it. (Sorry for the dark pictures, by the way… I seem to always be cooking after the sun goes down and may also not be interested in taking the time to arrange my photos before chowing down.)

They have a unique cooking process, and they call for ingredients you probably have on hand. They end up with a pretty significant pocket of air inside, but that just means you can eat more with less guilt, right? Don’t listen to me...

Stephen loves them (I do too!) and has asked for them several times since. Though still delicious by themselves, they’re not very sweet, so they make a great dessert drizzled with some honey.

Random side note: My friend owns a “bee farm,” Desert Creek Honey, and we get our honey from him. You cannot beat local, all-natural, raw North Texas honey – so good for you, and so delicious! I highly recommend them.

Ingredients

The recipe comes from Better Homes and Gardens. They’re pretty “eggy,” so if you just can’t stand eggs for some reason, you may want to avoid nun’s puffs.

  • 1/2 cup butter
  • 1 cup milk
  • 3/4 cup flour
  • 4 eggs
  • 1 Tbs sugar (optional: you can also mix in about 1 tsp cinnamon with the sugar if you want a light cinnamon flavor)

Directions

Preheat the oven to 375° F.

  1. Grease a muffin tin, including around the edges and top of all 12 cups.
  2. Melt the butter in a medium saucepan, then add the milk. Bring to a boil.
  3. Add the flour all at once and stir vigorously until it forms a ball that is somewhat solid and doesn’t run all over the place.
  4. Remove from heat and let it cool for 5 minutes.
  5. Add the eggs one at a time, stirring vigorously with a wooden spoon for 1 minute after each addition or until smooth.
  6. Divide dough into the 12 muffin cups (they should be about 2/3 full) and sprinkle with sugar (or cinnamon-sugar mixture).
  7. Bake 30 minutes or until puffy and golden-brown. They will deflate a little after a while, so they’re best served immediately, but they’re still wonderful the next day!

I made them a few months ago, but I never got around to posting the recipe. However, now that I don’t have time to cook much, I’m glad I have an arsenal of pictures/recipes that haven’t yet been posted!

Nun Puffs recipe

And while I’m at it, may I just say that these expressions on that tiny face are enough to make me smile uncontrollably?

Baby Lightning Faces

Read Full Post »

cinnamon sugar biscotti

She had never made it without trying (unsuccessfully) to substitute several healthier ingredients like applesauce (she doesn’t recommend it…). I had never even attempted it. But that afternoon, Kelsey Beth and I set out to make cinnamon sugar biscotti.

(If you think biscotti is that brittle stuff that’s hard to chew, you’ve never had good biscotti.)

I used a recipe from one of my all-time favorite food blogs, Annie’s Eats.

Ingredients

It actually uses ingredients you probably already have on hand! (I love recipes like that… the cheapo in me sings for joy a little bit.)

  • 2 cups flour
  • 1 1/2 tsp cinnamon
  • 1 tsp baking powder
  • 1/4 tsp salt
  • 1 cup sugar
  • 6 Tbs butter (at room temperature)
  • 1 egg plus 1 egg yolk
  • 1 tsp vanilla
For the topping:
  • 2 Tbs sugar
  • 1/2 tsp cinnamon
  • 1 egg, lightly beaten (or…. and I didn’t think of this until afterward… but you can just save the unused egg white from the main recipe and just use that instead of using a whole other egg.)

The recipe actually calls for a lot more sugar and cinnamon in the topping, but it also means you’ll have way more cinnamon sugar left over than you know what to do with. Even my adapted version will probably leave you with excess, but at least it’s a little better.

Directions

As we were making them, we were a little doubtful of how they would turn out, since they started out so oddly shaped and small. We were pleasantly surprised, however, when they puffed up perfectly and sliced into neat little fingers of biscotti.

  1. Preheat the oven to 325° and line a baking sheet with parchment paper.
  2. Combine the flour, cinnamon, baking powder and salt. Set aside.
  3. Cream the butter and sugar together (in a separate bowl from the flour mixture) on medium-high speed (we used a handheld electric mixer) about 3-4 minutes or until fluffy.
  4. Blend the egg and egg yolk into the butter mixture, and then add the vanilla.
  5. Reduce mixer speed to low, and mix the dry ingredients into the butter mixture.
  6. Break the dough in half, and shape each half into a log about 9 inches long and 1 1/2 inches wide. It will probably fall apart while you shape it, but just be gentle and try it again. It doesn’t have to be perfect. Place each log on the baking sheet about 3-4 inches apart.
  7. Combine the sugar and cinnamon for the topping. Brush the top of each log with the egg mixture and sprinkle with the cinnamon sugar topping.
  8. Bake 40-45 minutes (halfway through baking, rotate the baking sheet so the back part is moved to the front). Remove the logs from the oven and let them cool just enough to handle. Slice at an angle to achieve about 10-12 slices per log (Yes, it is possible. No, unfortunately I did not get a picture of this part.).
  9. Replace the biscotti on the baking sheet, cut side down, and generously sprinkle on more of the cinnamon sugar topping. Bake an additional 10-15 minutes. (Though I think we ended up doing it closer 20 minutes… This worked for us, but don’t overcook it! It may still seem a little soft when you check it, but once you take it out, it should harden up.)

I had only eaten biscotti a few times in my life. It just wasn’t a food I normally thought of. This recipe may have just changed all that. We dipped it in hot chocolate, but it was wonderful by itself too; it wasn’t dry or flavorless at all. Our husbands arrived just as we took the biscotti out of the oven (perfect timing, huh?), so they got to try it too.

We split the leftover biscotti and sent Kelsey Beth & co. home with a bag of it. The next day, we found out that both parties (us and them) had both ended up completely finishing the biscotti that very night.

cinnamon biscotti on a plate

Read Full Post »

Older Posts »