Feeds:
Posts
Comments

Archive for the ‘Recipes’ Category


Homemade yogurt is so easy in the slow cooker! ~ bonjourHan.com

We eat a lot of yogurt.

  • We eat it as a snack plain or mixed with cinnamon
  • We eat it for breakfast mixed with thawed frozen blueberries, a sprinkle of nuts or granola, and a drizzle of honey
  • We eat it as a sour cream substitute on top of our food
  • We bake with it
  • We use it in tuna salad and chicken salad to lighten up the mayonnaise
  • We mix it into curries to cut the spice for the kids
  • I’ve even used it as an emergency substitute for milk when baking (more to come on that)

Several years ago I started making my own yogurt, and it has saved us quite a bit of money. This recipe yields a lot of fresh yogurt, plus a quart or two of whey, depending on how thick I want my yogurt. Because of the return, I usually feel okay spending the extra for organic milk (around $6 for a gallon around here). This can be even cheaper if you don’t use organic milk. I have done both.

Ingredients

If you don’t go through absurd amounts of yogurt like we do, you can easily half the recipe.

  • 1 gallon of whole milk
  • 1 cup of plain yogurt (Greek or regular)

Look at the ingredients on the yogurt and make sure it includes “live and active cultures.” That is what is going to turn the milk into more yogurt. Once I actually used whey from a previous batch of yogurt when I realized last-minute that I didn’t have any actual yogurt, and it worked! But I only tried it once, so you’re welcome to try it, but maybe get a few successes with the actual recipe first.

Directions

  1. Pour the whole gallon of milk into the slow cooker and replace the lid. Turn on LOW for 3-3.5 hours. I usually set my phone alarm to go off rather than using a timer.
  2. At that point, turn the crockpot OFF but don’t remove the lid. Just leave it alone (with the slow cooker OFF) for 3-4 hours.
  3. After that, ladle out about a cup of the warm milk into a 2-cup measuring cup. Add the 1 cup of yogurt to it and whisk to combine. Pour this mixture back into the slow cooker and whisk.
  4. With the slow cooker still OFF, wrap a bath towel around the slow cooker and place another bath towel on top of the slow cooker. The towels act as insulation so the milk can culture into yogurt. Leave it alone for about 9-12 hours (I aim for about 10).
  5. Place a large colander over a bowl to collect the whey (the wonderful liquid that drips out). Line the colander with two layers of cheesecloth and strain the yogurt on the countertop for 1-3 hours depending on how thick you want it to end up.
  6. Transfer the yogurt into a container and refrigerate. Pour the whey into a jar and refrigerate. You can use the whey in baking as a delicious substitute for water or milk. I have even successfully used it instead of milk to make macaroni and cheese.

It may seem complicated, but once you make it a time or two, it will seem SO EASY. I have gotten into a rhythm where I can make it with minimum dishes and effort. For example, after pouring the whey into a jar, I use the bowl that previously held the whey to wash the cheesecloth. I fill it with dish soap and water, swish the cheesecloth around, then swish it in clean water a few times to rinse. Then both the bowl and the cheesecloth get clean.

You also need to think about when you are going to start; you don’t want to get partway through and realize you are going to have to wake up in the middle of the night to turn off the crockpot or mix in the yogurt (let’s pretend I have never done that). I usually start the process around 3 or 4 in the afternoon. That way, it cultures overnight and it’s ready to strain in the morning.

Do me a favor and don’t taste the yogurt until it has been chilled in the refrigerator. Room-temperature yogurt is not the best way to taste your success.

What are your favorite ways to eat yogurt?


Read Full Post »

Blueberry Banana Pancakes ~ bonjourHan.com

These pancakes look and smell amazing. I’m sure they would taste amazing too, but unfortunately I don’t like bananas. “Don’t add bananas,” you might say. But these faces love bananas.

This is why I make banana pancakes even though I can't stand bananas.

So the bananas stay.

Ingredients

  • 3/4 cup unbleached all-purpose flour
  • 1/4 cup buckwheat flour
  • 1/4 cup white whole wheat flour
  • 2 Tbs cornmeal
  • 1 Tbs sugar
  • 1 1/2 tsp baking powder
  • 1/2 tsp baking soda
  • 1/2 tsp salt
  • 1 1/2 tsp cinnamon
  • 2 eggs
  • 2 Tbs coconut oil
  • 1 – 1 1/4 cup unsweetened almond milk (My 3-year-old is lactose intolerant)
  • Butter for greasing the pan (Not THAT lactose intolerant)
  • 1 cup fresh blueberries
  • 1 banana, thinly sliced

I doubled the recipe and froze most of the pancakes. On busy mornings (or regular morning, let’s be honest) I can just pull a few out of the freezer and pop them in the microwave. My kids eat them unadorned with their hands, and aside from random smears of blueberry juice, cleanup is minimal. Unless the 3-year-old wants to see what happens when he crumbles the rest of his pancake into his cup.

Directions

  1. Whisk the dry ingredients together in a bowl.
  2. In a separate bowl beat the eggs.
  3. In a third bowl or microwavable measuring cup, heat the almond milk and coconut oil in the microwave until slightly warm (try 30 seconds). The coconut oil should be melted, but you should be able to stick the tip of your finger in it without feeling pain. That is my highly technical method for calculating the temperature of my baking liquids. If it is too warm, let it sit for a few minutes.
  4. Slowly pour the milk/coconut oil mixture into the egg bowl while whisking.
  5. Add the dry ingredients to the bowl of wet ingredients and whisk gently until mostly smooth (some lumps are ok). It should be somewhat thin, like cake batter.
  6. Gently fold in the blueberries.
  7. Heat a skillet or griddle over medium heat and when hot, “draw” all over the griddle with the unwrapped end of the stick of butter (or do something more civilized, whatever).
  8. Ladle about a 5″ circle of batter onto the griddle and drop a few banana slices on top. Repeat until you run out of space. Once the tops have lots of tiny bubbles and the pancakes appear to be more solid, flip them over to finish cooking.

I then cool them on a cooling rack and pop the whole thing in the freezer to flash freeze before removing them to a gallon-size plastic bag. Because I’m not the awesome mom who cooks breakfast in the actual morning (ain’t nobody got time for that).

Blueberry Banana Pancakes from bonjourHan Blog


This recipe is adapted from a book called “Cast Iron Cooking” by Dwayne Ridgaway.

Read Full Post »

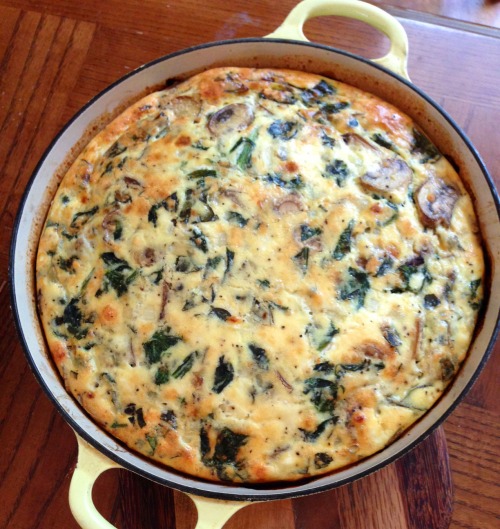
Breakfast Frittata - bonjourHan.com


We try to limit the amount of carbs we eat, and this frittata gives us a healthy option to grab in the mornings. I usually make it at night and then slice it into eight pieces and stick it in the fridge. For the next few days we grab a piece and microwave it for about 45 seconds for breakfast. It’s good for you, and it’s full of flavor. It’s also very flexible with what you have in your fridge.

Ingredients

It changes every time I make it, but this is what I used most recently.

  • 1 Tbs butter
  • 1 Tbs extra-virgin olive oil
  • 1/4 to 1/2 of a large onion, chopped
  • 1 clove garlic, minced
  • 1 package sliced mushrooms (This ingredient can be substituted for any number of other vegetables. Roasted red pepper is delicious too!) (Also, I can’t remember off the top of my head how many ounces are in a package of mushrooms. Is it 8 oz.? Basically, you’re going for one of those regular containers or mushrooms with the plastic wrap over the top. Or another kind. it doesn’t really matter.)
  • 2-3 cups chopped fresh spinach (or kale, or swiss chard, or any other leafy green besides lettuce)
  • 1/2 cup chopped fresh basil (or 1 teaspoon dried basil)
  • 8 eggs
  • 1/2 cup plain Greek yogurt (you could also use sour cream or heavy cream or even milk, though if you use milk, I would reduce the amount to about 1/3 cup)
  • 1/4 cup grated parmesan cheese
  • 1/2 to 1 cup of another cheese, grated or crumbled (Our favorite in this is feta, though it’s also delicious with cheddar, monterey jack, etc. We even used goat cheese once, and it was amazing.)
  • 1/2 tsp salt
  • 1/2 tsp black pepper

Directions

It takes a little time, but most of it is hands-off. I use my cast-iron skillet, so I don’t have to change pans to put it in the oven. If you don’t have a cast-iron skillet, you can sauté everything in one pan and transfer it to a pie pan for baking.

  1. Preheat oven to 375° F. Heat the butter and oil in a pan over medium heat.
  2. Add the onions and garlic and sauté until the onions are tender.
  3. Add the mushrooms and sauté a few minutes more, until they begin to soften.
  4. Add the spinach and stir until it begins to wilt. Remove from heat and stir in the basil. If not using a cast iron skillet, dump the contents into a pie pan.
  5. Whisk together the eggs, Greek yogurt, both cheeses, salt and pepper in a separate bowl.
  6. Pour the egg mixture into the skillet or pie pan and gently stir to distribute everything evenly.
  7. Place in the middle rack of the oven and bake for 30-40 minutes (you may need to watch it off and on for the last 10 minutes to keep it from getting too brown on top).

You can also mix everything up at night and store the sautéed vegetables separately from the bowl of whisked eggs. In the morning, just combine and pop into the oven.

Having a frittata ready to go in the fridge helps me actually eat breakfast, since I’m usually busy with these two cuties:

Brotherly love - bonjourHan.com


He squints one eye when he smiles, just like his daddy.


Smiling baby - bonjourHan.com

Mommy and big brother - bonjourHan.com


What would you put in your frittata?


Read Full Post »

Peach Galette ~ bonjourHan

Ah, peach season. Warm, juicy, ripe fruit dripping with the sweet nectar of summer in Texas.

Unfortunately, it’s January, and while winter grapefruit is delicious, it does not belong in a galette. I have also never successfully convinced Stephen that grapefruit is useful for more than just making the sink garbage disposal smell nice. Peaches are LONG gone, but I saw this picture in some old iPhone photos and thought I would post the recipe, since (A) It’s one of our favorite go-to desserts, and (B) I wanted a galette. I still don’t have a galette, but at least now everyone else can know what I’m missing out on right now.

Galettes…

“Any old pie crust” will not do. The crust is a crucial part of this dessert, partly because it needs to hold up structurally, but mainly because there’s not enough filling to “mask” over it. You will definitely taste it, so it needs to be good.

Side note: Why even have a pie crust if it’s only going to be bland and possibly gross? Why not just have a bowl of pumpkin or baked apple filling and save everyone the trouble? A pie crust should be good. It should actually add to the flavor of the pie, not detract from it or have no taste. Even a simple crust with just a few ingredients can be delicious if it’s the right one for the pie. (If you have any more questions on My Food Philosophy 101, please see me after class.) But seriously. Crust. Don’t waste the carbs if it’s not good, man.

Ingredients

I adapted this crust from a galette crust recipe in “Cast Iron Cooking,” by Dwayne Ridgaway.

For the crust:

  • 1 1/4 cups flour
  • 1 Tbs sugar
  • 1/2 tsp salt
  • 7 Tbs cold butter, cut into pieces (If you can’t do dairy, then shortening is fine, but if you can, please use real butter!)
  • 3 Tbs ice water
  • Optional: 1/2 Tbs milk to brush over the prepared crust

For the filling:

  • 2 ripe peaches (ideally they will be soft and juicy, but not mushy)
  • 1-2 Tbs brown sugar (depending on how sweet your peaches are. Yes, I advocate taste-testing your peaches as you slice them. For safety purposes. And research. And posterity. And stuff. Basically, you need to end up with approximately two sliced peaches. If you started out with three, it’s none of my beeswax.)
  • 2 dashes cinnamon
  • 1 tiny dash nutmeg
  • Optional: 1/4 teaspoon vanilla extract

I actually don’t have a “recipe” for the filling and never measure, so this is just a guess on how much of everything to use. It should also tell you that this is a flexible recipe. Use whatever you have, and play around with it if you want. I would say the peaches and the sugar are the only required filling ingredients. And if “sugar” looks like honey  or maple syrup to you, I say go for it (though keep in mind the filling will probably be more likely to ooze out of the galette with the liquid sweeteners).

Directions

Preheat the oven to 400° F.

If you have a food processor:

  • Use plastic dough blades if you have them.
  • Toss in all the crust ingredients and pulse until it forms a ball.

If you don’t have a food processor:

  • Mix the flour, sugar and salt in a bowl. Using a fork or a pastry cutter, “cut in” the butter until it looks like large crumbs. Basically, this means mashing the butter until it becomes a million tiny pieces and is evenly distributed in the flour.
  • Add the ice water and mix with a fork until it forms a ball.
  1. Roll out the dough into a big circle (maybe 8-10 inches) on a baking sheet lined with parchment paper. The baking sheet must have edges, because the galette will likely leak a bit, and you do not want to chisel a hardened layer of burned fruit syrup off the bottom of your oven.
  2. Slice the peaches thinly and toss into a bowl with the remaining ingredients. It should not be as wet or gooey as a typical pie filling.
  3. Dump the filling into the center of the circle and fold up the edges toward the center, leaving a large “hole” (see the top photo on the left).
  4. Brush the milk over the folded crust for a simple glaze.
  5. Bake for 40 minutes. Let it cool for five minutes after removing it from the oven, then slice it into fourths like a pie. It serves four. Or, let’s be honest, two…

We also love apple galettes and berry galettes, depending on the season.

  • For apple, thinly slice an apple (or two, depending on the size) and mix with some brown sugar, cinnamon and a dash of ground nutmeg or cloves.
  • For berry, mix with some white sugar and about 1/2 teaspoon of lemon juice. Berries are very juicy, so I would avoid using more than 1 cup of berries for the filling.

Read Full Post »

No bake cookies ~ bonjourHan.comIt’s time.

I have made these cookies 6 or 7 times over the past few months, but I kept forgetting to take a picture of them so I could post the recipe. However, today is your lucky day, as I actually remembered to write the blog post and have a batch of No-Bake Cookies in the fridge AT THE SAME TIME.

These actually have a lot of ingredients that are good for you, so while each cookie is about 126 calories, a good portion of it is healthy calories your body can actually use. (I don’t know about you, but to me, it’s a perfect excuse to eat more.)

Stephen doesn’t really like coconut, but he loves these cookies. I can’t get enough of them either. They come together in just a few minutes, and they will set in the fridge in about 30 minutes.

They are both dairy-free and gluten-free (if you use gluten-free oats), and they use no refined sugar.

Ingredients

With the exception of dark/baker’s chocolate, I typically have all of the ingredients on hand, so I can whip up a batch if I need something quick.

  • 2/3 cup real maple syrup
  • 1/4 cup coconut oil ( have a big container of extra-virgin coconut oil that I use for everything from cooking to moisturizing my face. I love the stuff.)
  • 4 oz unsweetened baker’s chocolate (or 1/2 bar dark chocolate)
  • 2-3 Tbs cocoa powder
  • 1/2 cup peanut butter (I usually use creamy, but I’ve made it with crunchy before too, and it gives it some extra crunch.)
  • 1 tsp vanilla
  • 1 cup quick oats (I have also successfully used gluten-free regular oats.)

I’ve been wanting to try it with almond butter sometime instead of peanut butter; I think it would be delicious! If you try it before I do, let me know how it tastes!

Directions

These are easy, and they use very few dishes (yes, sadly, that is often a factor in deciding what to cook. My 15-month-old is not quite ready to be my personal dishwashing assistant.)

  1. Combine maple syrup, coconut oil, chocolate and cocoa powder over medium heat. I usually measure out my other ingredients and leave them in their measuring cups while it heats up. When it boils, stir constantly for 3 minutes, then remove from heat.
  2. Stir in the peanut butter, vanilla and oats until smooth.
  3. Line a cookie sheet with wax paper. Use a measuring cup to scoop out the mixture and pour 16 dollops on the cookie sheet. Lick the spoon. Place in the refrigerator for at least 30 minutes to harden.

I store mine in the refrigerator, because I think they taste best chilled, and because coconut oil melts at such a low temperature that I don’t want them to have to stand up to Texas heat.

This is an original recipe.

126 calories/cookie, if you’re counting

Baby Lightning Cookie ~ bonjourHan.com

Baby Lightning eating cookie ~ bonjourHan.com

Read Full Post »

Older Posts »